FREE Super Fruits Eye Balm with $130 or more purchase

Sunday 30 March 2014

Covering all of My Bases

Hey, everyone! Despite my makeup madness being in full effect for nearly two decades (geez, I'm old), until quite recently I was the kind of girl who only had a single foundation in her stash. Maybe two. While my lipstick, blush, and eye shadow collections have always been bountiful, my selection of base products was typically quite sparse. Over the past two years, however, my foundation stash has grown exponentially. With so many incredible formulas in the market, it's been hard to resist!

My current foundation lineup consists of 10 products, ranging from sheer to full-coverage, dewy to matte, and $5 to $70 price tags. The full gamut! Here's a peek at them:


For today's post, I thought I'd provide a description of each foundation, including the finish, coverage, undertone, and closest MAC shade (as it seems to be a universal reference point). Hope you find it helpful!

For reference, I have a fair skin with neutral to warm undertones (MAC NC15-20). My skin type is combination/oily and acne-prone and I generally prefer bases with medium to full coverage.


By Terry Cover Expert Perfecting Fluid Foundation
Shade: #1 (neutral-cool, ~NW20)
Coverage: Medium-Full
Finish: Semi-Matte
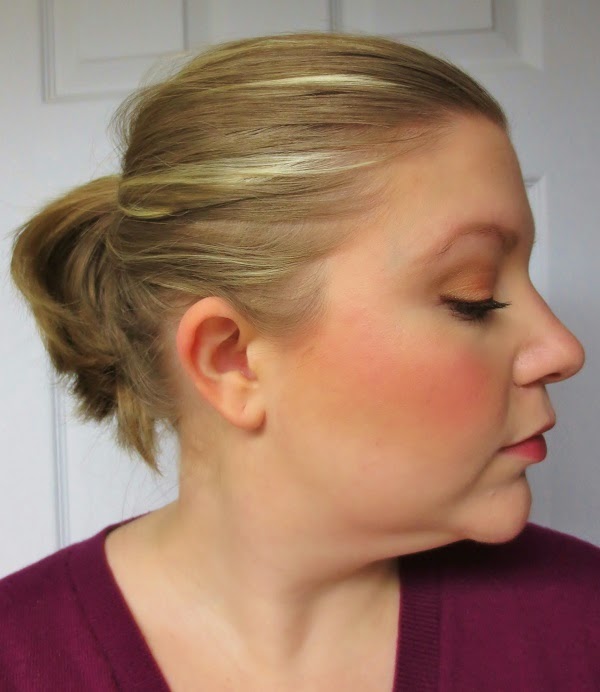
The newest addition to my collection and one of the most expensive. It has a lovely matte-but-not-flat finish and gives beautiful coverage. Very little need for additional concealer and powder! Wears evenly with minimal shine for 7-8 hours. To see me wearing it, click here!

Shu Uemura Face Architect Smoothing Fluid Foundation
Shade: #784 (warm, ~NC15)
Coverage: Medium
Finish: Satin-Matte
Had high hopes for this when I purchased it, but have reached for it rarely. The initial finish is even and mildly glowy, but unfortunately this doesn't have the best staying power. Plus the shade is a bit too pale for my skin, except for during the depths of Winter. To see me wearing it, click here!

Clinique Perfectly Real Makeup
Shade #1 (neutral, ~NC/NW15-20)
Coverage: Light-Medium
Finish: Natural Matte
I used to wear this ages ago and am happy to have it back in my stash. This offers lovely natural coverage (not too dewy, not too matte) and the colour match is pretty spot-on. The coverage can be built up to medium and it wears 5-7 hours with minimal shine. To see me wearing it, click here!

Wet N' Wild Coverall Cream Foundation
Shade: 815 Fair (neutral-cool, ~NW15-20)
Coverage: Medium
Finish: Satin
This was a pleasant surprise, especially given that it cost only $5! Evens out skin nicely with a glowy, but not greasy finish. The shade is slightly light on me, but wearable during the Wintertime. Unfortunately the wear time isn't the greatest, as there is significant breakthrough shine after 4-5 hours. To read a full review of this, click here!


Laura Mercier Mineral Powder
Shade: Real Sand (warm, ~NC20)
Coverage: Light-Full
Finish: Satin Matte
This was a staple in my daily routine a few years ago and I recently picked up a new tub in a makeup swap. This is the best mineral foundation I've ever tried- the coverage is impressive and it leaves a heavenly glowy finish. The wear time is good, but not phenomenal- it starts to get a bit cakey on my oily skin after about 5-7 hours. To see me wearing it, click here!

Revlon Colourstay Makeup Combination/Oily Formula
Shade: 150 Buff (neutral-warm, ~NC15-20)
Coverage: Medium-Full
Finish: Matte
My all-time favourite foundation. Hands down! Leaves skin looking matte and flawless for over 10 hours without looking cakey or feeling heavy. If you like fuller coverage and are on a drugstore budget (or just want to try something awesome), you have to check this out! To see me wearing it, click here!

Chanel Vitalumiere Aqua Ultra-Light Skin Perfecting Makeup
Shade: B10 (warm, ~NC20)
Coverage: Light-Medium
Finish: Satin
This foundation is quite out of my comfort zone, but I love it! The coverage is sheer, but buildable and it leaves a wonderful glowy finish that feels weightless on the skin. It looks like my real skin, but better! The wear time is impressive given the sheerer texture, but is not one to reach for when you need a foundation to wear all day. Looks it best for the first 5-6 hours. To read a review, click here!


Garnier Miracle Skin Perfector BB Cream Combination to Oily Skin Formula
Shade: Light (warm, ~NC20)
Coverage: Medium
Finish: Semi-Matte
Another new-ish addition to my collection, I'd heard great things about this! This leaves skin looking ah-mazing upon first application. It covers most imperfections and gives a completely non-greasy glow. Unfortunately, this tends to get shiny and a bit cakey after 5 hours or so, but for the first few hours, it's perfection! To see me wearing it, click here!

Chantecaille Just Skin Tinted Moisturizer
Shade: Bliss (warm, ~NC20-25)
Coverage: Sheer-Light
Finish: Dewy
I was lucky to score this in a makeup swap, as it's quite pricey. This is the best tinted moisturizer I've tried, hands down! Makes skin look natural, but perfected and gives a dewy, not oily finish. Bliss is a bit too dark for my complexion, so I generally use this to sheer out and add a glow to my fuller-coverage, matte foundations. To see it mixed with ColourStay, click here!

Too Faced Beauty Balm
Shade: Vanilla Glow (neutral-warm, ~NC25)
Coverage: Light-Medium
Finish: Satin
I also scored this in a makeup swap because I'd heard great things! This blends beautifully into the skin and evens skin out nicely. It wears reasonably well on my oily skin (6-7 hours, which is better than many BB creams I've tried), but unfortunately, Vanilla Glow is noticeably too dark for me. Even in summer! Contemplating whether I should buy the lighter shade, Snow Glow, and mix the two.


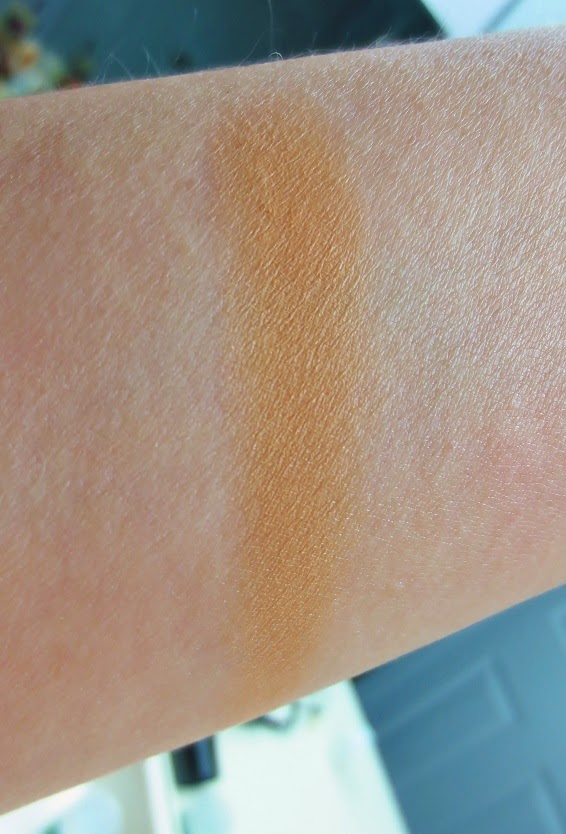
And here are all 10 foundations swatched on my inner arm (MAC NC15 skin tone). I tried to arrange them from lightest to darkest and have labelled each:


And one final shot of all my bases:


So there you go! I hope you found it helpful to read a bit about all of the foundations in my collection and take a peek at them swatched side-by-side. I'm definitely going to make an effort to use some of these up over the coming months and perhaps swap away the few that just aren't my favourites. There are a few foundations I've been super tempted by lately (for instance, Tarte's Amazonian Clay options and BeneFit's new BB cream offering), but I must finish others up first!

Have I tempted you with any of the foundations here? How many bases do you have in your stash? What are your all-time favourite base products?

Thanks for reading! xo

Friday 28 March 2014

Look of the Day: Vibrant Beauty does Pixiwoo (does Kat Dennings)

Hi, everyone! I've been a huge fan of Sam and Nic from Pixiwoo for ages; they have wonderful, engaging personalities and are beyond talented when it comes to makeup. Those girls have serious skills! Their tutorials are forever gracing my computer screen and a recent installment sprung me to action. I had to re-create it!

Earlier this month, Sam from Pixiwoo presented her best Kat Dennings impression and it was spot-on! I've always admired Kat for her comedic chops, confidence in her curvy frame, and gorgeous features. Sam captured Kat's trademark soft, smokey eyes and bold, plush lips perfectly and I decided to attempt my take on this stunning look! To watch the tutorial that inspired this look, click HERE!

Photo from Sam's Pixiwoo Tutorial (www.youtube.com/user/pixiwoo)


This look was characterized by dewy, flawless, skin, a soft rosy cheek, sultry eyes, and a glossy, bold red lip. For the skin, I opted for my new go-to foundation, By Terry Cover Expert to even things out and impart a subtle glow. I used very little face powder to keep things as fresh-looking as possible! To emulate the soft, rosy flush donned in the tutorial, I chose my favourite matte pink blush, Laura Mercier Powder Blush in Rose Petal, sweeping it gently up my cheekbones, blending towards the temples. 


Sam created an eye look using a matte, slightly plummy grey on the lids and a warmer cork-toned brown on the crease. I didn't have these exact shades to work with (but was very tempted to buy the Too Faced Chocolate Bar Palette to emulate it perfectly), so I improvised. I applied RMS Cream Eye Shadow in Magnetic (a shimmery plummy taupe) all over the lid as a base. I next added a touch of Selfish (a taupe grey from The Balm's Nude 'Tude Palette) on the centre of my lid to cut down the dewiness of the cream shadow. I applied the softly shimmery, mid-tone brown shade from the Wet N' Wild Comfort Zone Palette in the crease of my eye to add some warmth and smudged Sultry (a warm, matte butterscotch shade from Nude 'Tude) underneath my eye to smoke things up. For liner, I used a matte black eye shadow on the upper lash line, winged out slightly (but not too dramatically, as the lips are still the central focus) and a deep, matte brown shadow underneath the eye for added definition. 

For the boldest feature- the lips!- I followed Sam's advice of first lining the lips to prevent feathering and next applying a rich, glossy red all over the lips. She used OCC Lip Tars for the look (they are heavenly!) and I opted for a mix of NARS Satin Lip Pencil in Majella and Marc Jacobs Lust for Lacquer Lip Vinyl in No Regrets. For the final touches on the lips, I applied a small amount of NYX Jumbo Lip Pencil in Burgundy underneath the lower lip to create the illusion of extra fullness (a tip touted by Sam in the video) and gently smudged to upper lip line to emulate Kat's stunning lip shape.

And voila, the final result!


Here's a full list of everything I used:


The Breakdown:

Foundation Primer: Sunday Riley Effortless Breathable Tinted Primer in Light
Foundation: By Terry Cover Expert Perfecting Fluid Foundation #1
Concealer: BeneFit Fake-Up in Light (under eyes)
Powder: MAC Blot Powder in Medium
Bronzer: Hourglass Ambient Lighting Powder in Dim Light (lightly as a bronzer) 

Blush: Laura Mercier Powder Blush in Rose Petal

Brows: Anastasia Brow Powder Duo in Taupe and Anastasia Tinted Brow Gel in Caramel
Eye Primer: Urban Decay Primer Potion in Original
Eye Shadow: RMS Cream Eye Shadow in Magnetic (all over the lid, up to the crease, as a base), Selfish (from Nude 'Tude; applied to centre of the lid), warm cork brown shade from the Wet N' Wild Comfort Zone Palette (on the crease and smudged underneath the eye), Sultry (from Nude 'Tude; smudged underneath the eye), Sassy (from Nude 'Tude; as a highlight on inner corners and brow bones)

Eyeliner: Sassy eye shadow from the Balm Nude Tude 
(on upper lash line) , Sleek eye shadow from Nude 'Tude (on lower lash line), and NYX Wonder Pencil in Light (on lower waterline)
Mascara: Clinique Lash Doubling Mascara in Black

Lip liner: Clinique Quickliner for Lips in Deep Red (to outline and fill in lips as a base), NYX Jumbo Lip Pencil in Burgundy (under lower lip to increase fullness)

Lipstick: NARS Satin Lip Pencil in  Majella
Lip Gloss: Marc Jacobs Lust for Lacquer Lip Vinyl in No Regrets (on top of Majella to add dimension)


And a few more shots of the look:


I had such fun creating this look- it's bold, feminine, and full of attitude- just like Kat, I suppose! It may not be a spot-on copy of Sam's brilliant tutorial, but I think (I hope!) it still captures the essence of the look pretty well. If anything, this was a sexier, more sultry version of my everyday makeup. I went out to sushi with the bf in this makeup and I felt like a total fox! One of the many wonders of makeup ;)

So to wrap up, thanks to Sam at Pixiwoo for sharing this killer tutorial and thanks to Kat Dennings for being so freakin' cool! Hope you enjoyed this look- is it something you'd sport? Have you ever been inspired by a Pixiwoo makeup tutorial?

Thanks for reading! xo

Tuesday 25 March 2014

Photot Tutorial: Olivia Wilde's Oscars Look!

Hi, everyone! Earlier this month, I shared with you my picks for the best makeup looks at this year's Academy Awards. I got you to vote for which of the featured looks you'd like me to re-create in a tutorial, and the clear winner was... Olivia Wilde!

I was jazzed to emulate her red carpet look, as it was all about bold, graphic winged liner and nude peachy cheeks and lips. Mod perfection! 

I finally got the chance to re-create the look over the weekend, so here you have it: my step-by-step photo tutorial of how to master Olivia Wilde's '60s-inspired 2014 Oscars look! Hope you find it helpful!


So let's start at the beginning!

1) Start with moisturized, primed skin. Starting with a smooth canvas is always a must! Pick whatever moisturizer and primer combo makes your skin look its best and wears well under foundation. I opted for Antipodes Divine Face Oil and Sunday Riley Effortless Tinted Breathable Primer in Light. Now you're fresh-faced and ready for foundation!


2) Create a Flawless Base. Olivia's foundation offered moderate coverage and a satiny matte finish. Not dewy, but definitely not flat. Choose a foundation that will even out your skin tone without looking mask-like. I chose By Terry Cover Expert in Shade #1. Then, apply powder, but only in areas where skin gets oily. Too much powder will leave things looking cakey, rather than fresh. I applied Revlon ColourStay Pressed Powder in Light very sparingly on my t-zone and around my eyes. 


3) Add a subtle contour! Olivia's cheeks were gently defined on Oscars night, so I added a subtle contour underneath my cheekbones to emulate the look. Pick a shade just a couple tones darker than your natural complexion, preferably in a matte finish for an extra natural look. I applied The Body Shop's Honey Bronze Bronzing Powder in Fair Matte in the hollows of my cheeks with a kabuki brush. 

4) Eyebrows! As you can tell, I have very little in the way of natural brows, so filling in my arches is a daily chore. If you have more generous brows, just be sure to leave them neat and groomed. Olivia's brows were defined without being too bold, so simply use your favourite brow colour and/or gel to make your natural brow shape look its best. I used Maybelline's Define-A-Brow pencil in Dark Blonde, then combed the excess out with a bare spoolie brush. 


5) Prime the eyelids and add a matte, natural base. To start the eye look, add a swipe of your favourite eye shadow primer. We don't want anything to budge! I used Urban Decay's Original Primer Potion formula. Looking closely at Olivia's eye, you'll see there is very little shimmer on the lids. So, for the base colour, I chose a matte ivory shade (Urban Decay Bleach), applying it all over my lid and up to the brow bone. 

6) Warm up the eye and add a touch of glitz. To add subtle depth to the eye, I applied a nearly matte warm peachy pink (Urban Decay Minor Sin) to the crease of the eye, blending up towards the brow bone. Close inspection of Olivia's eye look reveals just a touch of glitter near the crease, so I also added a small dash of Urban Decay Sidecar just above the crease for a pop of festive glitter. 

7) Draw the guidelines for the winged liner. Time for the fun part- the liner! I was excited to hear that Olivia's makeup artist used my all-time favourite liquid liner on Oscars night- Revlon ColourStay Liquid Eye Pen in Blackest Black. I had this very liner on hand, so I put it to work! To start a dramatic winged liner, first draw a guideline, based on the desired length and angle of the liner. Olivia's liner was angled upward and seemed to extend to nearly the tip of her brow, so this is the shape and dimension I went for. It's always good to start more subtle, since you can always extend the line later!


8) Thicken the liner for extra drama! After the initial guideline was drawn, I thickened the liner by starting at the outer tip of the guideline and drawing back into the centre of the eye, gradually extending the liner to the inner corner. 

So it's #1, draw a guideline upwards and outward from the outer corner of the eye to create the length and angle of the winged liner and #2, start at the outer tip of guideline and draw inwards to thicken the liner

After the general shape is created, you can gradually thicken the liner further to its desired intensity! I love the felt-tipped applicator of Revlon ColourStay Liquid Eye Pen- it gives incredible precision!

9) Lots of lashes! It appears that Olivia was wearing false lashes on Oscars night, but since I'm rubbish at applying falsies, I opted for two bold coats of my favourite volumizing mascara, BeneFit They're Real! But by all means, if false lashes are up your alley, apply your favourite set after swiping on a coat of mascara. 


10) Add a pop of peach to your cheeks! Olivia's Oscars look featured a subtle, glowy-looking pinky peach blush. To emulate this look, I first applied some Stila Convertible Colour in Gerbera to the applies of my cheeks using a Real Techniques Stippling Blush. I find that starting with a cream blusher adds a lovely dewiness to the cheeks. To up the colour intensity slightly, I added a very light dusting of The Balm Frat Boy blush over top of Gerbera, blending it up to my temples. 


11) Pale out lips and add a peachy nude lipstick. Olivia's lips were quite nude in this look, courtesy of Revlon's Super Lustrous Lipstick in Pink Incognito. As this shade is not a member of my stash, I opted for the closest hue in my collection, YSL Rouge Volupte in Tender Peach, a pale mod nude peach. To up the paleness of this lipstick, I first applied some concealer on my lips (Hard Candy Glamouflage in Light) to start with an even base. 


And there you have it! The completed look! In only 11 easy steps, heehee. So maybe this wasn't the most concise of tutorials, but hopefully you found it fun and helpful!


Here's one more peek at Olivia's Oscars look, followed by a few more shots of my take:


And here's a peek at the key products used in creating this look:

Urban Decay Naked Palette, Urban Decay Shattered Face Case, YSL Rouge Volupte in Tender Peach, Revlon ColourStay Liquid Eye Pen in Blackest Black, Stila Convertible Colour in Gerbera, Real Techniques Stippling Brush, The Balm Frat Boy Blush, By Terry Cover Expert Foundation


Overall, I had such a fun time creating this look- and sporting it for the rest of the day! I've always been inspired by 1960's mod makeup, and Olivia wore it so well this year at the Oscars!

How do you think I did at re-creating this look? Is graphic winged liner up your alley?

Thanks so much for reading! xo

Monday 24 March 2014

Veracious Product Review: The Body Shop Honey Bronze Bronzing Powder in Fair Matte

Hi, everyone! If you've been reading the blog lately, you'll know that I've been sending out much love to The Body Shop, a brand with which I've happily rekindled a love affair. Long overdue! One of the goodies I picked up in a recent haul is a bronzer that has received heaps of love in the blogosphere. The Body Shop's Honey Bronze Bronzing Powders have been praised not only for their unique, beautiful design, but also for their fair-skin-friendliness and flattering matte finish. Sign me up! 


The Honey Bronze Bronzing Powders come in circular-shaped compacts with a stunning, almost holographic honeycomb pattern. Look how lovely it looks in the sunlight!


The back of the packaging features the shade name, net weight, and recycling information, with the ingredients listed on a layer beneath:


Ok, just one more shot of the outside, as it's so incredibly pretty!


Trance over, moving on... wait, more beauty! Opening the compact reveals the product itself, which also features the honeycomb motif, sculpted into the powder. Such a nice touch! It gives the surface of the bronzer a quilted texture and is definitely a pleasure to look at. Almost too pretty to use! Almost ;)


Of the 4 shade options to choose from (love that there are multiple shades!), I opted for the second lightest hue, Fair Matte 02. It is a warm, golden honey brown that's just a few tones darker than my natural skin colour. The finish is matte-but-not-flat with just a tiny hint of glow to prevent things from looking dull. There are no visible shimmer particles, just an oh-so-subtle sheen. All of these factors make this bronzer the ultimate choice for those with fair skin who want to impart a natural, warm hue to their wintry pale complexion! 

Here is a swatch of Fair Matte 02, applied heavily on my inner arm (MAC NC15 skin tone):


And here are some "Before" and "After" shots to demonstrate the effect of the bronzer on my skin. Here I am wearing foundation and powder, but no other colour on my cheeks:

"Before" The Body Shop Honey Bronze Bronzing Powder

And here I am with a generous helping of Fair Matte applied up my cheekbones. As you can see, it really warms things up without looking heavy, orange, or unnaturally shimmery:

"After" The Body Shop Honey Bronze Bronzing Powder

Here's another look at its effect on my skin, under slightly cooler lighting. Not only does it add a subtle bronze, it also evens out my complexion quite nicely! The slightly yellow tones in this bronzer work wonders to neutralize the diffuse redness in my skin. 


And here it is, in the context of a completed makeup look, blended with my beloved Clinique Cheek Pop in Ginger Pop


And now for a full breakdown of the ups and downs of this pretty product:

Pros:

  • Incredibly wearable shade for those with fair skin. No hints of orange or red.
  • Flattering, natural matte finish
  • Sheer, but buildable formula makes it nearly impossible to over-do it!
  • The golden tones in the bronzer help to even out redness in the skin
  • Blends effortlessly and wears all day!
  • Incredibly beautiful and unique packaging
  • At just over $20, this is not a true budget buy, but is still a great value!
  • Cruelty-free and animal friendly- always a huge plus in my books

Cons:
  • Not for those who prefer a shimmery finish to their bronzers
  • May not be dark enough for my skin in the summertime (though will still make the perfect Fall through Spring bronzer!)

As you can see, the "Cons" list is terribly short. I really love this stuff! The shade is so easy to wear and the finish is incredibly natural and flattering. The price is right and the packaging is gorgeous. 'Nuff said! Go out and grab one if you want to look bee-autiful! ;)

Have you tried this bronzing powder? What are your favourite subtle bronzers for Winter and Spring?

Thanks for reading! xo

Saturday 22 March 2014

Currently Obsessed: The Body Shop Spring Bronze Shimmer Cubes Palette

Happy weekend, everyone! If you read my latest post, you'll know that I recently dropped into The Body Shop and picked up a few new goodies for Spring. Among them was the lovely Spring Bronze Shimmer Cubes Palette #30, a fun and geometric set of eye shadows rich with sultry, glistening tones perfect for the impending warmer weather (it will be coming eventually, right?? Canadians, you know what I mean :P).


Shimmer Cubes have been a perennial staple in The Body Shop's makeup line, but none has ever graced my collection. It was a Spring Makeup video from Ruth at A Model Recommends that convinced me that I needed this one in my life. So glad I was swayed!

Shimmer Cubes Palettes come in (appropriately) square-shaped plastic cases that include four separate cubes of (again, appropriately) shimmery colour. Here's a look at #30 in the sunlight:


The four shades included are Rich Espresso (a deep, neutral shimmery brown), Burnished Gold (a warm, slightly green-tinged mid-tone gold), Dusty Fawn (a shimmery yellowed ivory), and Warm Copper (a bold orange with copper and bronze undertones).

 
As for the packaging, it takes a bit of fiddling, but is so worth it! For this reason, Ruth at A Model Recommends dubbed this "the cube of great frustration and eventual delight". A wittily apt moniker!

When you remove the plastic lid of the palette, you'll see that each individual shade also has a little lid. This is because the formula is quite shimmery and, left uncapped, the shadows could easily make quite a mess!


Upon removing each little lid, the actual product is revealed. Like my artistic arrangement? ;)


Here are swatches of all four of the shades on my inner arm (MAC NC15 skin tone). I swatched them quite heavily with a dry, dense brush (they can also be used wet for more intensity):

The Body Shop Spring Bronze Shimmer Cubes swatches (L-R): Dusty Fawn, Burnished Gold, Warm Copper, Rich Espresso

And here's a look I created with the palette! I applied Dusty Fawn all over the lid up to the brown bone and on the inner corners of the eyes as a highlight. I then applied Burnished Gold all over the lid to add some warmth. Next, I popped Warm Copper on the outer half of my lid for a flash of vibrant colour. Finally, I applied Rich Espresso to the crease for some depth and definition. I must say, the shades worked perfectly together!


And here it is, in the context of an entire makeup look:


As always, the title of this post has given away just how tickled I am with this product, but here is a full breakdown of the ups and downs of The Body Shop Spring Bronze Shimmer Cubes Palette:

Pros:
  • Perfectly coordinated shades, especially suited to Spring and Summer
  • Can be applied sheer or built up for a bolder colour payoff
  • Fairly intense shimmer, but not over-the-top glittery
  • Long-wearing formula- this look really lasted all day!
  • Despite the powdery, shimmery texture, there was very minimal fallout from these shadows. My cheeks were spared from piles of sparkles!
  • At just over $20, this isn't a steal, but is far from a splurge. A great value, in my opinion!
  • Cute, compact packaging
  • Cruelty-free, which is always a huge plus in my books!
Cons:
  • As noted, the packaging might be a bit tedious to use (but is actually quite functional, as it prevents the shimmer from getting everywhere!)
  • Not the best choice for those who like instantly pigmented shadows. You really have to layer these to get a strong colour payoff!
  • As the name suggests, these are very shimmery, so not a good option for those who prefer a matte finish.

There you have it! Products like these make me so happy that I have re-kindled my love affair with The Body Shop. I can see myself reaching for this palette pretty constantly over the Spring and Summer, especially on the weekends when some colour and glimmer are in order!

Are the shades in this palette up your alley? Have you ever tried Shimmer Cubes Palettes from The Body Shop?


Thanks for reading, and don't forget you can enter my 350 Follower Giveaway, HERE!


Have a great weekend! xo

Thursday 20 March 2014

Body Shop Haul!

Hi, everyone! I started my love affair with The Body Shop quite early. At the age of 11, it single-handedly initiated my foray into skin care and makeup. My first-ever lip gloss was a deep berry number from their Colourings cosmetics line (anyone else old enough to remember that?) and their catalogue was the first to inform me of my "combination" skin type (better pick up a Pineapple Face Wash, pronto!). 

Nostalgic interlude aside, The Body Shop has been a brand that I've used off and on over the years, but one that had been much ignored in my collection of late. A shame! Over the past several months, I've heard numerous raves about some of their new offerings and my passion was re-ignited. So when they had a Buy 2, Get 1 Free special over the weekend, I was happy to oblige!

Here's what I picked up:


Honey Bronze Bronzing Powder in Fair Matte
I've heard so many bloggers rave about this one, both for its unique, mesmerizing design and incredibly natural, wearable colour. Being both a fair-faced gal and a lover of honey, I was eager to check it out! Fair Matte is the second lightest shade offering and is a lovely golden brown tone. And the packaging truly is lovely! I was lacking a matte bronzer in my stash and this one has filled that gap nicely!

Spring Bronze Shimmer Cubes Palette #30
Shimmer Cubes have been a Body Shop makeup staple for ages, but it was Ruth at A Model Recommends that finally convinced me I needed to try one. She deemed this new Spring palette "the cube of great frustration and eventual delight" and created a stunning warm, sultry look with its 4 shimmery hues (check it out, here). I was hooked! The palette consists of a deep neutral brown, a warm gold, a yellowed ivory, and- the star of the show- an orange copper. Perfect shades to transition from Spring to Summer!

Aloe Calming Toner
I had actually not heard much about this product, but I was in need of a new toner and this seemed like a perfect option! Aloe-packed alcohol-free toners tend to agree best with my skin, so I have high hopes for this one. Designed for sensitive skin, this is supposed to soothe and calm the complexion while moisturizing and purifying. Looking forward to giving it a go!


Last weekend was my first proper Body Shop visit in ages and it was such a pleasure! They have so many lovely new products in-store as well as some nostalgia-swelling classics (Banana Shampoo, anyone?) that will keep me coming back. Look out for reviews of my new goodies soon!


And don't forget, you can enter my 350 Follower Giveaway, HERE!


Thanks for reading! xo

Tuesday 18 March 2014

Veracious Product Review: My Beauty Diary Broccoli Sheet Masks

Happy hump day, everyone! If you saw my last post, you'll know that my friends (and my wonderfully obliging boyfriend) dabbled in sheet masks last weekend to fun and hilarious results! If you've ever seen a beauty blogger donning a papery white mask that renders them quite creepy and mannequin-like, they're probably wearing a sheet mask. A staple in Asian skin care, sheet masks may look scary, but they're touted for their excellent ability to deliver ingredients to the skin and provide an ultimately pampering experience. Who wouldn't sacrifice a few minutes of looking like a ghost to earn some seriously glowing skin? :)

I'm no stranger to sheet masks, as I've tried options from Missha and Purederm in the past. But this was the first time I gave My Beauty Diary, a popular Taiwanese brand, a go. There were many sheet masks to choose from this line, but we eventually opted for the Broccoli Mask (approximately $14 per 10 masks). First off, who ever thought of putting broccoli in skin care? Had never seen it before! Second, how cute are the little cartoon broccoli on the packaging? And third, the ingredients looked pretty fab. More on that in a moment...


We picked up a 10-pack of masks, which came in this fairly large, rectangular green box:


The majority of text on the box is not in English, but luckily there was a sticker that featured the directions. As you can see, it instructs you to leave the mask on for 20-30 minutes and, after removing it, massage in the excess serum. It says that each mask contains 23mL of product, which is quite a lot!


The majority of text on the back of the package is in Mandarin, but luckily it features an English list of ingredients!


There are several impressive elements to this mask! To hydrate, it includes glycerin, aloe, sodium lactate, and hyaluronic acid. To brighten and exfoliate, it features pineapple, lime and apple fruit extracts, and to soothe, it offers cucumber. And of course, broccoli extract, which promises to rejuvenate the skin. It's also free of mineral oil, alcohol, parabens, and artificial colour. All very nice! 


When you pull the mask out of the package, it is quite dripping with serum. Also, unlike other sheet masks I've tried, it features a plastic backing that you have to peel apart from the mask itself. It also looks quite creepy on the counter!


Ok, here it is... Don't get scared now...

Me wearing the mask! As you can see, the fit of the mask isn't perfect. I fiddled with it tons, but nothing would make it fit quite right around my eyes and nose. It didn't help that I was cracking up every 30 seconds, but that's another story! The mask becomes translucent when applied tightly to the skin, rather than maintaining an opaque white look. It was more than large enough for my round face and had adjustable flaps around the chin and cheeks. 


Oh gosh, I am horrifying....


I kept the mask on for about 25 minutes, whilst snapping photos with my boyfriend, laughing at my friends, similarly clad in sheet masks, and sipping some beer. Fun fun!

Here's what my skin looked like post-mask. I found my complexion to look incredibly even-toned (this is even for me, I promise!) and glowy. There were no hints of redness or irritation. Although my skin felt quite hydrated, it was not left greasy or shiny. I was impressed!


Here's a full breakdown of my impressions of the My Beauty Diary Broccoli Mask:

Pros:

  • Packed full of potent ingredients for hydration, brightening, and exfoliation
  • Free of alcohol, parabens, mineral oil, and artificial colour
  • Felt cooling and soothing on the skin
  • Light, pleasant fruity-herbal scent
  • Left my skin glowing and hydrated, without any greasiness
  • Did not irritate my skin; in fact, it calmed down redness in my complexion!
  • After a few uses, this hasn't broken me out
  • At less than $1.50 per mask, this is a pretty good value!
Cons:
  • The mask fit really awkwardly on my face. It took a lot of shifting, but still didn't fit well around my eyes and the bridge of my nose.
  • The mask was almost too saturated with serum. It was very drippy upon removal from the package, which made for a messy application, and tons of serum was left on the mask after use. Felt like lots was going to waste! 
  • Might not be quite hydrating enough for those with drier skin. A post-mask moisturizer will be needed!

So there you have it! I think it's fair to say that, despite the awkward fit, this is the most effective sheet mask I've ever used! It left my skin glowy and hydrated without irritation or greasiness. I've used it a few times now and the same lovely results were replicated. My friends have drier skin and found that they needed to apply a separate moisturizer afterwards to seal in the hydration from the mask. On my oily skin, massaging in the excess serum was all I needed!

I'm really excited to try out more sheet masks from My Beauty Diary! They make you look scary as hell, but leave your skin looking freakishly lovely :)

Have you tried My Beauty Diary? What are some of your favourite sheet masks?


And don't forget, you can enter my 350 Follower Giveaway, featuring goodies from Tarte, Essie, Revlon, and more, HERE!