FREE Super Fruits Eye Balm with $130 or more purchase

Wednesday 28 September 2011

Photo Tutorial: A "No Makeup" Makeup Look

I was recently spending a lazy evening perusing YouTube's latest offerings and, as usual, I ended up spending a great deal of time on Lisa Eldridge's channel (which can be found here: http://www.youtube.com/user/lisaeldridgedotcom). Lisa is a professional makeup artist who has provided makeup looks (ranging from bold, to classic, to uber-natural) for a variety of magazines, photo shoots, and celebrities. Her tutorials are inspiring and helpful, and her down-to-earth demeanor keeps me watching!

One video that particularly caught my intention was Lisa's "No Makeup Makeup" look, which outlines how to achieve a natural, makeup-free look (with the help of some makeup, of course!).

You can watch the video here: http://www.youtube.com/watch?v=oGpLLWnO3XY&feature=channel_video_title .

Because most of the looks and tutorials I've included on my blog have tended to focus on quite bold and colourful looks, I decided to switch things up and demonstrate how a simple, polished, "your face but better" look can have just as much impact!

Here is the final look, after which I've broken everything down into steps:


1) Prep and Perfect Skin

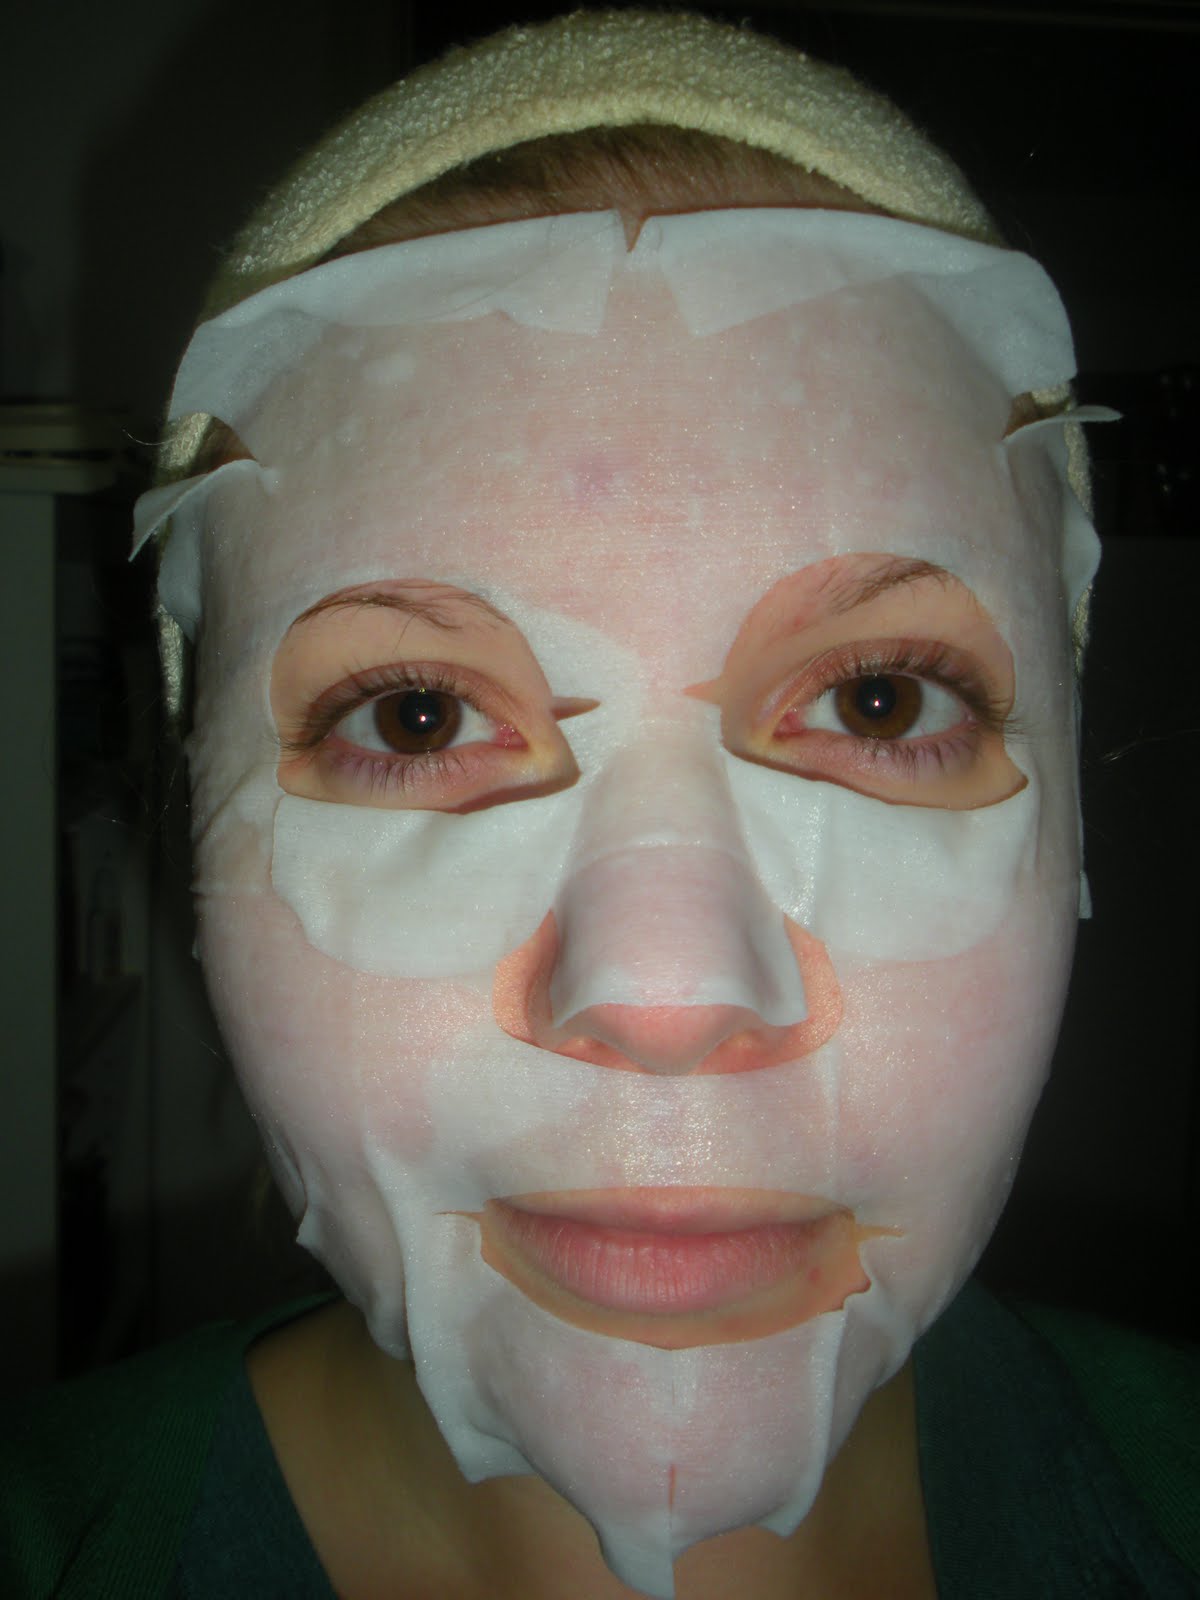
Because glowing, natural-looking skin is key to this look, it is important that your skin is looking its best before any makeup is applied. This can mean giving yourself a mini facial (exfoliating or using your favourite face mask), or simply using a moisturizer or foundation primer that leaves your skin even and glowing. I chose to use Purederm's Rose Essence Sheet Mask, as rosewater has been known to minimize redness in the skin and witch hazel (also in the mask) works to tighten pores. Here's a scary picture of me wearing the mask, as well as the its ingredients:


2) Even out Skin Tone and Conceal Imperfections

After your skin care has been applied, the next step is to even out your skin tone so that it looks flawless, but natural. If your skin is already quite even-toned, you can simply apply a concealer under the eyes and to any areas of redness or discolouration you might have. If your skin has any uneven, blotchy, or blemish-prone, you can start with a tinted moisturizer or sheer foundation before applying concealer. I used a mix of shade #21 and #23 of Missha's Perfect Cover BB Cream, which covers most of my imperfections and leaves a glowy finish. Next, rather than using a traditional opaque concealer, I used a brightening concealing product under the eyes and on patches of redness, as was recommended in Lisa Eldridge's video. The one I chose was Boots No 7 Radian Glow Concealer. Here's a picture of it:


Concealers such as this work to mask areas of darkness or redness via light-reflecting pigments, rather than thick, opaque formulas. This adds to the the natural-skin effect, while still camouflaging most of what you want to hide! For a more luxe version of this product, try Clinique's Airbrush Concealer or Yves Saint Laurent's Touch Eclat

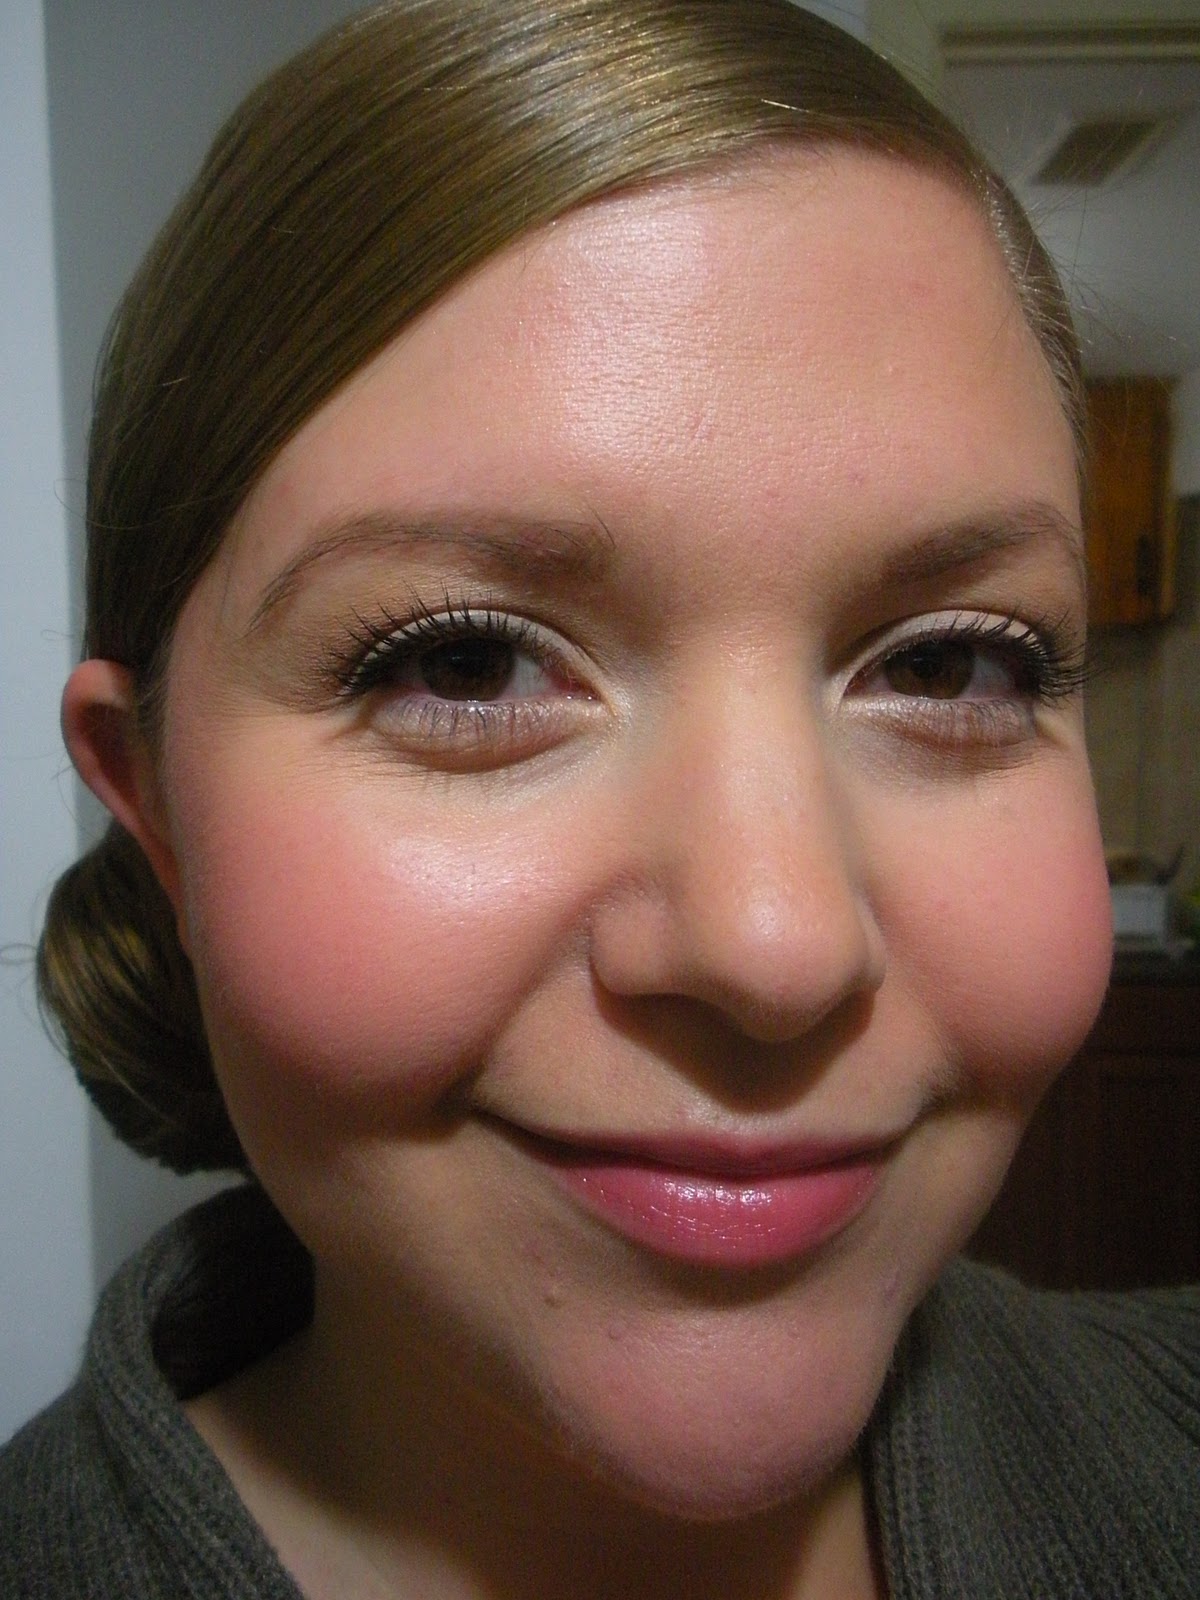
Here is what I looked like after this step:


3) Find a Blush that Complements your Natural Flush

Next is it important to find a blush that mimics the natural colour of your cheeks when they're flushed. As you can see from the previous picture, my cheeks have a natural pinky hue, so I chose a blush that accented this (NYC's Blushable Creme Stick in Plaza Pink).  If your skin is very yellow-toned or more olive-toned, you can choose a peachy or coral shade- whatever imitates your natural flush!

I think that cream blushes work best for this "no makeup" look, as this type of formula melts right into the skin, then can be subsequently toned down with a touch of powder. If you prefer a powder blush formula, it's best to apply it after face powder, rather than beforehand.

Here's what I looked like after applying cream blush:


4) Light Dusting of Powder (and Bronzer)

If you do not have problems with oiliness or shine, it is perfectly ok to skip this step- the more natural skin that shows through, the better! As my skin tends to be oilier, I applied a very thin layer of translucent powder (MAC Blot Powder in Medium). It is important to use a light hand with powder for this look, as the goal is just to tame shine, without leaving skin to matte or cakey. Bronzer is another optional aspect of this look. Because we're still on the tail end of summer, I went with it! Also using a light hand, I applied Hard Candy's Hula Hula Bronzer to my forehead, cheekbones, and down the bridge of my nose.

Here's what I looked like at this point:


5) Define your Brows

Because the rest of the makeup is fairly soft in this look, it is important that brows be defined, as to provide some structure to the face. At the same time, you don't want the brows to look too harsh, so it's best to stick with a brow powder, rather than a pencil. I defined the natural arch of my brows using Anastasia Brow Powder Duo in Ash Blonde.


To add further, subtle definition to the eyes, you can apply some of the colour you have used to fill in your brows to the crease of the eye. Lisa recommended this in her video, and I found it did a great job at giving the eye some shape without screaming "I'm wearing eyeshadow!". Here are some pictures of what my eyes looked like after applying some of my Anastasia Brow Powder in Ash Blonde to my crease:


6) Eyeliner and Mascara

Eyeliner is definitely an optional aspect of this look, but for those who can't go without, Lisa recommended a helpful trick for lining the eyes without having to use a thick, noticeable line. She suggested applying a soft brown or grey liner directly on the lash line, pressing the colour gently in between the lashes. Although I went with a black liner (NYX's Eyeliner in Black), the look was still incredibly soft and natural. Here's what the eye looked like after finishing this liner technique and applying one layer of black mascara (Boots No 7 Maximum Volume Waterproof Mascara):


And in the context of the whole look:


7) Lip-enhancing Lipstick

Adding colour to the lips really finishes off this look nicely, and the goal is to choose a colour just one shade darker or brighter than your natural lip colour. I chose NARS Sheer Lipstick in Dolce Vita, which adds a natural blush to my lips without giving an obvious lipstick look. My lips are quite pale naturally, but if yours are more pigmented (i.e., naturally dark or rosy), you may just want to apply some clear lip balm, rather than a lipstick.

Here's what NARS Dolce Vita looks like on me:


And that's it! Here are a few pictures of the final look, in various lighting:


I hope that you found this tutorial helpful! Looking forward to your comments, suggestions, and ideas! :)

Thursday 22 September 2011

Photo Tutorial: Natalie Portman's Modern, Polished Everyday Look


Aside for my admiration of Natalie Portman's acting skill, ethical convictions (she's a proud vegan!), and undeniable natural beauty, I was also drawn to the above issue of Elle Canada because of the makeup look Ms. Portman was sporting on the cover. It definitely makes a statement with its perky pink lipstick and softly sultry eyes. At the same time, though, it is a look that can certainly be worn on a daily basis for a polished, professional, yet punchy look.


As you can see from this closeup, this makeup look is characterized by a subtle, brown smoky eye, flushed pink cheeks, and vibrant (but not over the top) rosy lips. I found it to be the perfect balance between vibrant and demure. And I've done my best to re-create it here for you!

Here's my final look, after which I've broken everything down step-by-step:


Step 1: Base and Blush

Natalie's above look features flawless-looking skin with a slightly dewy finish. To even out my skintone and erase redness, I applied Missha Perfect Cover BB Cream in a mix of shades #21 and #23. To cover up my undereye circles and any remaining red spots, I used MAC's Pro-Longwear Concealer in NC20.

(L-R):  Missha Perfect Cover BB Cream in #21 and 23, MAC Pro Longwear Concealer in NC20, and NYC Blushable Creme Stick Blush in Big Apple Blush


Natalie's look also features rosy pink cheeks- like a natural flush, with a bit of a kick. To emulate this, I used NYC's Blushable Creme Stick in Big Apple Blush.  I like to apply cream blushes before face powder, as they blend nicely into the foundation. It's ok if the blush looks a bit brighter than desired at this stage, as applying powder over top will tone it down a bit. Here's what it looked like at this point:


Step 2: Powder, bronzer, and highlighter

Once the above products had set on my face (I usually wait about 15 minutes or so), I applied a sheer layer of MAC Blot Powder in Medium. This worked to tone down shine, even out the complexion further, and mute the blush slightly. To emulate Natalie's sculpted cheekbones and warm glow, I used some of Hard Candy's Hula Hula Baked Bronzer to contour my face and give this look a summery feel. I applied the bronzer mainly below the blush, along my temples and forehead, and down my nose.

Left: MAC Blot Powder in Medium. Right: Hard Candy Hula Hula Bronzer. Front: Guerlain Meteorites in Mythic Beige

To up the glow factor a bit, I applied a small amount of shimmery gold highlighter (Guerlain Meteorites in Mythic Beige) on my cheekbones above the blush, and on the bridge of my nose. Here's what everything looked like at this point:


Step 3: Brows!

Natalie's look features some seriously defined brows. They are bold, but not distracting or over-the-top. To re-create this effect, I first filled in the sparsest areas of my brows with Clarins' Brow Pencil in Soft Blonde 03. Then, I finished with a layer of Anastasia Brow Powder Duo in Ash Blonde, thoroughly combing out the excess product afterwards with the spool end of Anastasia's Brow Brush. You can do the same with a clean mascara wand!


Step 4: Brighten the eyelid and brow bone

I next chose to brighten and highlight the eye area (before adding any smoky effects), focusing on the centre of the eyelid, brow bone, and inner corner of the eye. For this, I used MAC's Powder Eye Shadow in Ricepaper, a soft, shimmery golden yellow shade. Here's what that looked like:


Step 5: Apply a Soft, Smoky Brown

To solidify Natalie's smoky brown eye, I applied a warm, mid-toned, gold-flecked brown eye shadow to the crease and outer corner of the eye, as well as lightly to the lower lash line. I wanted to add some depth and interest to the eye, without making things too bold to wear on a daily basis. MAC's Powder Eye Shadow in Woodwinked was perfect for this! Here's how it looked:


Step 6: Eyeliner

Eyeliner is the perfect way to add more depth and definition to a smoky eye, but the goal here was to do so without adding too much drama. No one wants to hide their eyes behind raccoon-like loads of black eyeliner on a daily basis (though it can be fun for a night out!), and Natalie's cover look shows a perfect way to achieve this. Rather than a pitch-black liner, I chose to use a softer black shade with a hint of gold to add some warmth. I applied NARS' Soft Touch Shadow Pencil in Aigle Noir in a thin line on the upper lid, winging it out slightly, and also lightly on the lower lid over the brown eyeshadow already there:


Bottom right of palette: MAC Powder Eye Shadow in Ricepaper. To the right: MAC Powder Eyeshadow in Woodwinked. Standing up: Boots No 7 Maximum Volume Waterproof Mascara in Black. Lying down: NARS Soft Touch Eye Pencil in Aigle Noir

Step 7: Mascara!

No smoky eye (subtle or otherwise) is complete without full, sexy lashes. Natalie seems to be wearing a couple coats of black mascara on her cover look, and I was happy to mirror this, using Boots No 7 Maximum Volume Waterproof Mascara on top and bottom lashes:


Here's how the finished smoky eye looked, before attending to lips:


Step 8: Lipstick

For me, the prettiest part of Natalie's cover look is the lip. I loved the bright, warm shade of pink lipstick she wore, which added a flirty pop of colour to this otherwise neutral look. To re-create the shade, I applied a mix of MAC Amplified Lipstick in Chatterbox and NARS Semi-Matte Lipstick in Schiap (which I've featured on the blog previously). Schiap created a matte, fuchsia base, while Chatterbox warmed up the colour and added a hint of shine. Here's what it looked like:


(L-R): MAC Amplified Lipstick in Chatterbox, NARS Semi-Matte Lipstick in Schiap

And- ta da!- here is the final look! I was happy with how it turned out, and am eager to give it another try. Here are a few pictures of the my completed attempt, with a dramatic one at the end to mirror Natalie's sultry cover pose. Again, more dorky than sexy, but I can live with that ;)


I would love to hear any feedback or questions you may have about this post. And, as always, thanks for reading! :)

Wednesday 21 September 2011

Fun At-Home Facial Using Korean Sheet Masks!

Wow! It's really been nearly a month since my last post. Where has the time gone? As the crisp fall air begins to displace the muggy remnants of summer, I'm feeling an increased resolve to regain a sense of dedication and focus. This includes motivation to eat healthier, plunge head-first into my PhD dissertation, and- of course- a renewed zest for blogging!

Before my blog posts start to take on an autumnal tone (fall is my favourite season!), I still have to review a fab new product I discovered over the summer. On a (not so recent) trip to the P.A.T. grocery store in Koreatown, I, as usual, wandered up to the second floor, which features an exciting array of Korean skin care and cosmetics. Looking for a fun, affordable product to add to my skin care arsenal, I found these:


PureDerm sheet masks in Rose Essence, Tomato Essence, Pomegranate Essence, and Brightening Essence


Purederm, a popular Korean brand, offers a variety of skin care products, but what caught my eye was their selection of sheet masks. A staple of most Asian face care traditions, sheet masks are single-use face masks that consist of cotton-like paper pre-soaked with skin-loving ingredients (wow, that's a lot of hyphens in one sentence!). At 5 for $10, I couldn't resist choosing a handful to test out. There were about 20 different options to pick from, and I brought home the five that I thought most closely suited my skin care needs. 4 of the 5 I chose are pictured above (I had to use one right away, so it didnt' make the picture!).


All of the sheet masks contain the same base ingredients, including collagen (to add moisture and plump the skin) and Vitamin E (purported to act as an antioxidant). They are advertised as appropriate for all skin types and for all seasons. The one I tried the evening of the following picture was the Tomato Essence Mask, which, in addition to the previously mentioned benefits, was supposed to refine pores and brighten skin. The mask itself is soaking wet with product, and comes in a soft, thin paper that you fit to your face. If you've never seen one before, it's definitely an interesting and different (and to some, including my boyfriend, frightening) look! Below is a picture of me wearing it:

Get prepared to be scared, people ;)


Me wearing PureDerm's Tomato Essence Sheet Mask

As you can see, it has cut-out holes for the eyes and slits around the edges to that you can adjust it perfectly for your  features and face-shape. Despite its ghastly appearance, these masks are quite comfortable to wear, feel quite refreshing, and do not sting the face at all. This is likely the result of the sheets not containing alcohol or harsh irritants. Perfect for my sensitive skin! I left the mask on for about 20 minutes, as directed, to find moist, glowing skin left behind. No traces of redness or clogged pores, as I've found with other facial masks and treatments. I was quite pleased!

I have used all of my 5 purchased sheet masks by now, and have been happy with them all! Although I haven't noticed much difference between the different types in terms of performance, it is nice to buy a variety because each offers a uniquely pleasant scent. Who doesn't want to wear a mask that smells of fresh tomatoes (or roses, or pomegranates) once in a while? :)

Overall, here's a breakdown of the pros and cons of this product:

Pros:
  • Alcohol-free and non-irritating. Did not sting my face or leave it red.
  • Left my face feeling moisturized, but not greasy
  • Pleasant to wear, with unique but not overpowering scents
  • At $2 per mask, they are quite affordable
  • The sheet mask format is a fun and novel way to pursue an at-home facial!
Cons:
  • It can take a bit of practice to master the technique of applying the mask to your face
  • It's difficult to say whether each type of mask offers specific, unique skin care benefits
  • These masks may not be moisturizing enough during the winter months, particularly for normal to dry skin types
  • You will not look cute when wearing the mask, though it can be fun to startle others with your new look! ;)
Thanks for reading xoxo