Monday, 30 May 2011

Yay for Birthdays (and Makeup-filled presents)!


Hi, everyone! It feels like it's been forever since I've written an entry, so I guess it's about time! One reason for the delay was that I travelled to Windsor this past weekend to celebrate my 28th birthday. The dismay associated with inching closer to 30 was greatly outweighed by all of the hugs, well-wishes, and laughs that I shared over the past few days. I feel very lucky!

And another reason for my gratitude was the makeup-filled gift that my sister gave me this year. She really picked out some wonderful goodies, so I thought I'd feature them here.

The first is Revlon's ColourBurst Lip Gloss in Strawberry. It's a beautiful sheer berry pink that goes on smoothly with a completely non-sticky finish. It doesn't have the best staying power, but the colour and texture are fabulous! This will be one of my summer staples for sure.

Revlon ColourBurst Lip Gloss in Strawberry

Revlon Strawberry Gloss on my lips. Makes them full and shiny!


The second item is MAC's eyeshadow in Star Violet. It's a unique mix of purple, brown, and gold, which looks great with my brown eyes! It applies very smoothly and is super pigmented. I look forward to pairing it with other purples, browns, and with golds and oranges for an interesting contrast effect.

MAC Eyeshadow in Star Violet
Star Violet used in the crease. My brow looks a bit funky here, but this is a pretty accurate depiction of how Star Violet shows up on my NC20 skin

My sister also bought me Hard Candy's Painted Lady Lip Colour in Perfect 10 (#183). I'd hear raves about this shade, and I wasn't disappointed, especially with a price tag less than $10. I have a really difficult time wearing nude shades of lipsticks because they tend to wash me out. Nothing cute about looking ghastly! Perfect 10 is a "perfect" solution for anyone who's in the same boat. It's definitely a nude shade, but is so sheer (and slightly glossy) that it leaves no trace of the erased, concealer lips look. It leaves your lips looking like themselves, but with a sheer, caramel-like glaze. Love it!

Hard Candy's Painted Lady Lip Colour in Perfect 10

Finally, I was treated to Hard Candy's Glamoflauge Heavy Duty Concealer. I haven't had a chance to test this out yet, but I've heard nothing but good things about it. It's supposed to cover all sorts of dark shadows and blemishes without looking cakey. Plus, the tube is huge and it costs less than $10, so you can't go wrong!


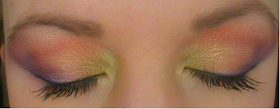
And here's a makeup look I did, using Star Violet and Strawberry ColourBurst gloss. Perfectly vivacious!


Thanks for reading, and thanks again to my sister for spoiling me with this gift! 

Thursday, 19 May 2011

Vibrant Summer Trend: Lemony Nails!


One of my favourite summer beauty trends so far is bright, sunny, and a little rebellious. Yellow nail polish! I first spotted this look when Chanel launched its summer makeup collection, which included a cheery yellow polish called Mimosa. The polishes Chanel releases almost invariably predict the "it" nail colour of the season (Black Satin, anyone?), and this is no exception. Yellow nails seem to be everywhere!

Chanel Le Vernis Nail Colour in Mimosa (Promotional shot)

The saffron-hued nails inspired by summer's designer makeup collections have also been spotted on several celebrities on the red carpet:


LOTS going on with MIA's look here, but the yellow polish is a nice touch!

Rihanna shows off her moody fingers

Natalie Portman adding a pop of colour to her neutral, polished look

I definitely don't get on board with every trend that emerges, but I couldn't resist one that was so summery and vibrant. And yellow is one of my favourite colours! The other day, I spotted this pretty shade at Shopper's Drug Mart. It's Nicole for O.P.I.'s Yellow, It's Me, and I only paid $5.50 for it! It's a true lemony yellow with subtle pink shimmer. The shade is very sheer, but when a few coats are applied, the result is rich, light-catching colour.


Sadie loves this summer trend! :)

So, if you're looking to indulge in a summery fashion craze that won't cost you an arm and a leg, head down to the drug store and pick up a vibrant, yellow polish. You'll love your new sunny nails :)

Saturday, 14 May 2011

My NARS Summer 2011 Makeover!

NARS Summer 2011 Promo Pic

While sitting here, stricken by a fairly nasty flu, I thought: how to make the best of this sick, lazy afternoon? Blogging, of course! I went for an extremely fun makeover yesterday afternoon and, despite my maladies, couldn't wait to share the details with you all here :)

The event I attended was a special promotion at Holt Renfrew to highlight NARS' Summer 2011 collection. As you can see by the promo picture above, this collection was characterized by tropical eyes, warm cheeks, and nude-ish lips. Assisted by a very friendly and helpful makeup artist, Sarah, I had my makeup done and arrived home with a bag of treasures:

My makeover haul!

I bought three items from the summer collection and, let me say, it was hard to narrow it down to three! I would have been happy to walk away with all of the new products. The first goody I picked up was an Eye Shadow Duo called Dogon, a mid-tone taupe with greenish-silver shimmer (which doesn't show up so well in the picture, but trust me, it's gorgeous!) paired with a shimmery black.

NARS Dogon Eyeshadow Duo Summer 2011

Dogon Closeup

The second item I bought was Powder Blush in Taj Mahal, a permanent item that made its way into the summer collection because it fit so well with the other products. It's a vivid orangey-tangerine shade with gorgeous (but not over the top) gold shimmer. It is VERY pigmented, so must be applied with a light hand!

NARS Taj Mahal blush

Closeup

The last item I bought was a new Velvet Matte Lip Pencil in Bolero, a matte nude-melon shade.


NARS Bolero Velvet Matte Lip Pencil Summer 2011


So here's what I looked like before the makeover... I'm only wearing my normal base products (foundation, concealer, powder), brows, a hint of bronzer, mascara, and lip balm.

Pre-makeover: Base products and lip balm

And here's what I looked like after the makeover! For the eyes, Sarah used the three colours from the new Cap Ferrat Eye Shadow Trio (pictured below). She used the lightest, sea-foam shade all over my lid, then used the darker green and turquoise shades in the outer corner, crease, and on my lower lash-line to create a pretty mermaid-esque smokey eye. Then, using a liner brush, she lined my upper eyelids with the black shade from the Dogon duo. For the cheeks, she first applied NARS Powder Blush in Sex Appeal, a pale, nude peachy blush, and later amped it up with a bit of Taj Mahal over top. For the lips, she first applied Velvet Matte Lip Pencil in Bolero and topped it off with NARS Lip Gloss in Giza, a shiny nude-peach colour.


Post-Makeover!


Made-over eye closeup

NARS Cap Ferrat Eye Shadow Trio Summer 2011


Closeup of NARS Bolero Velvet Lip Pencil + NARS Giza lip gloss

And here's a shot of what Bolero looks like without gloss on top. I love its pale pinky-melon hue, but I agree that it looks best with a touch of gloss on top, to add dimension.


Close-up of NARS Bolero on it's own (no gloss over top)

And of course, because I wanted to play with my new goodies right away, I instantly took out my purchases and added a few touches to my look. First, I applied the taupe shade from the Dogon duo in my crease, to add depth. Then, I added a bit more of Taj Mahal blush on my cheeks because I couldn't resist its bold, tangerine colour. When I first applied it I looked more clownish than cute, but after buffing it out with some translucent face powder, I thought it looked great! Finally, I added a touch of golden-orange gloss over top the Bolero lip pencil, to punch up the colour a bit. Here's the final result:


Post-makeover with my own tweaks added


Eye shadow closeup: NARS Cap Ferrat Trio with Taupe shade of Dogon in crease and Black shade of Dogon as liner

Ta-Da!
Thanks for reading, everyone! Let me know if you have any questions about the products or makeover process. Now I'm off for a flu-induced afternoon nap... Zzzzzzzzzzzzzzzzzzzzzzzzzz

Wednesday, 11 May 2011

Hard Candy Goes Drug Store!


The first time I ever stepped into Sephora (an historic and momentous day back in 1999), one of the first brands to catch my eye was Hard Candy. It was a teenage girl's dream: bright colours, cute packaging, and glitter everywhere. Looking past the girly aura, Hard Candy actually made some high-quality products. I owned a few of their eyeshadow quads, which were well-pigmented, perfectly coordinated palettes in shimmery silver sleeves (anyone remember them?).

A few years ago I was disappointed to hear that Sephora would no longer be carrying the brand... and was more recently excited to see that it had a new, more affordable incarnation. The line is now carried at Wal-Mart and most of the items go for $10 or less. They still sport the same glitzy and -dare I say- often over the top packaging but, like their original products, offer high-quality products, especially for the price. Plus, they have kept their anti-animal testing policy, touting the slogan "We <3 our animal friends. We don't test our products on them" on all of their products.

I recently bought two new Hard Candy products (both under $10) and thought I'd review them here:

The first is Hard Candy's So Baked Bronzer in shade Hula Hula. It's a sheer, but buildable bronze shade with subtle and natural shimmer. It gives my skin a gorgeous bronzy glow, with no hint of orange or fake-bake. It might be a bit too light for those with medium to dark skin tones, but it's perfect on my MAC NC20 skin.


Hard Candy So Baked Hula Hula Bronzer


And to make things even prettier, it has subtle gold veining throughout, for an extra touch of warmth. I will definitely be sporting this bronzer throughout the summer months. How refreshing to find a subtle, natural bronzer for less than $9!

Close-up: Bronze with gold veining

The second item I purchased was Hard Candy's Visibly Wet Shockingly Glossy Lip Pencil (a mouthful!) in the shade Inferno. The vibrant orange-fuchsia colour caught my eye right away, as did it's resemblance to NARS Velvet Gloss lip pencils, which I've reviewed here: http://vibrantbeautyblog.blogspot.com/2011/03/product-review-nars-velvet-gloss-lip.html?showComment=1300244630751#c8351848682692573170

Like the NARS, Hard Candy's Shockingly Glossy lip pencil offers rich colour and a truly shiny finish. As a one-up on NARS, Hard Candy's offers much more longer-lasting colour. While the NARS fades rather quickly, I think the Hard Candy would last for hours if left untouched. A huge downside, however, is that the texture of the Shockingly Glossy pencil is a lot thicker, making it fairly uncomfortable on lips. Plus, it contains pretty visible shimmer, bordering on glitter, so this level of boldness may not be for everyone.

Visibly Wet Shockingly Glossy  Lip Pencil in Inferno


Here is a picture of Inferno on my lips:


HC Inferno on lips

Overall, while the texture of Hard Candy's Visibly Wet Shockingly Glossy pencils isn't the greatest, these still pack an excellent colour punch for the $7 price tag. And the packaging is cute and convenient!

Although I don't prefer to spend my money at Wal-Mart often, checking out Hard Candy's frugal goodies gives me one good reason to visit the superstore once in a while. I'll keep you all posted if I find any other girly treats from the line!

Thanks for reading :)

Friday, 6 May 2011

Photo Tutorial: Vibrant, Retro look inspired by Kate Hudson in In Style


Of all the images in this month's In Style magazine, the one that inspired me most was the photo above of Kate Hudson. The makeup look is definitely bold and vibrant, and it is also extremely creative, with a retro touch. Seemingly inspired by both 70s excess and 80s punk, this look features nearly every colour of the rainbow, yet is somehow wearable on the fair-skinned Kate. Because this look appealed to me so much, I thought I'd try it out for myself! Here's the finished look:


Step 1: Base products and eyebrows
I started out with all of my basic base products: foundation, concealer, and powder, to create a bare canvas. I defined my sparse brows with Anastasia Brow Powder duo in Ash Blonde.

MAC Careblend Powder in Light Plus, Revlon ColourStay foundation in #150 Buff, MAC Pro Longwear concealer in NC20, Anastasia Brow Powder duo in Ash Blonde

Step 2: Contour cheeks with blush
To replicate Kate's deep, sculpted cheeks, I contoured my cheeks with MAC's blush in Sunbasque (pictured later in the tutorial). I applied it to the cheekbone and just underneath, then blended it into the hairline.


Cheeks contoured with MAC Sunbasque blush

And here are the main eye products that I used for the look:


MAC eyeshadow in Firespot and Pigments in Violet and Melon

MAC Holiday eyeshadow palette (from years ago, but it's still one of my faves!) and Make Up For Ever Aqua Eyes waterproof eyeliner in 11L

Step 3: Add Colour to the Inner Corner and Crease
Next, I applied the greenish-gold colour from the palette (MAC eyeshadow in Gorgeous Gold, available at MAC counters) to the inner corner of my eye, almost up to the brow. Then I applied MAC Melon pigment, a gorgeous peachy-gold shade to the crease, on the inner 2/3 of the eye. Here's what it looked like at this stage:


Step 4: Intensify the peachy orange shade
Next, I applied MAC Firespot eyeshadow to the crease, blending into the Melon pigment and slightly up and out.


Step 5: Create an outline for the purple shadow
In order to create a guide for the extended purple portion of the eyeshadow, I drew an extended line using Make Up For Ever's Aqua Eyes liner in 11L, an eggplant colour. It looks silly at this stage, but you'll be layering it with shadow afterwards, so don't worry!


Step 6: Layer on Purple Shadow
Using the liner as a guide, I applied MAC Pigment in Violet on the outer corner of the eye, extending up towards the end of my eyebrow. Using a thin shadow brush, I also applied some of the Violet pigment on my lower lashline:


Step 7: Intensify the Purple Shade
Next, to darken the purple, I applied the bluish-purple shade from the MAC palette over the Violet Pigment and blended it into the outer crease, just to where the MAC Firespot ended:


Step 8: Black Liner
Next, I applied some black liquid liner (Revlon Colourstay liquid liner pen in black) to the top and bottom lashlines (pictured above).

And here are some of the other products used in this tutorial:


MAC Blush in Sunbasque, Clinique High Impact Mascara, Urban Decay Primer Potion, which really makes eyeshadow look more vibrant and last all day!

Step 9:  Mascara
Next I applied black  mascara to finish off the eye look:


Finished eye look- open and closed!


Step 10 (the final step, I promise!): Lipliner and Lipstick
To copy Kate's deep, warm red lip, I first lined my lips with Clinique's Quickliner for Lips in Deep Red. Next, I applied Chanel Rouge Allure lipstick in Lover, one of my favourite reds. Finally to warm up the lip shade, I applied a shimmery bronze lipstick, Lancome lipstick in Luxe, over top. Here they are:


Lancome lipstick in Luxe (L) and Chanel Rouge Allure lipstick in Lover (R)

And here's the final look! Really happy with how it turned out. Except for the fact that my shots at dramatic posing look a lot more dorky than model-esque, but I guess that sums me up! :) Thanks so much for reading, everyone!!


The final look!!