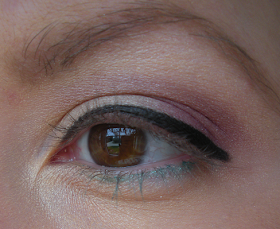
And yes, I do make dorky faces when I'm taking pictures of myself... ;)
Step 1: Base Products
First, you can start out with any base products that you normally use (i.e, foundation, powder, etc.). No need for any special foundations for this look, but if you want an extra fresh, springy finish, try a powder with a slightly soft, glowy effect. I used MAC's new Careblend Pressed Powder in Light Plus. Here are some pictures of the base products I used (including my invaluable brow powder, as my eyebrows are very sparse without it!) and of myself after using them:
 |
| (L-R): MAC Careblend Pressed Powder in Light Plus, Revlon ColourStay Foundation in 150 Buff, MAC Pro Longwear Concealer in NC20, Anastasia Brow Powder Duo in Ash Blond (with Quo angled brow brush) |
 |
| Starting out with foundation, concealer, powder, and brows |
Essential to any spring look is a pop of colour on the cheeks to brighten the face. My skin can look very dull and sallow otherwise, so I never leave home without a good blush! Neutral pink tones are flattering on almost everyone and are perfect for the season. Here I've used MAC Mineralize Blush in Dainty. A gorgeous pink! For some extra glow, try applying a powder highlighter to your cheekbones, above your blush. I've used a small amount of the ivory eyeshadow used later on this tutorial, applied lightly with my finger.
 |
| With MAC Mineralize Blush in Dainty. My face looks much brighter already! |
 |
| Closeup of blush |
 |
| Cheek and Eye products used- (L-R): MAC Mineralize Blush in Dainty, Victoria's Secret Heidi Klum eyeshadow palette (with Quo blush brush and a couple of old eyeshadow brushes from Lancome) |
3) Begin the eyeshadow...
Using a shimmery ivory shade, apply eyeshadow all over the lid, from lashline to brow. Concentrate on the centre of your eyelid, just under the arch of the brow, and on the inner corner of your eye. This will brighten the eyes and make them look larger and more awake! Next, apply a shimmery brownish-taupe shade to the crease of your eye (the space in between your eyelid and browbone, where the eye naturally creases when open). Make sure not to extend it too far towards the outer corner of the eye. Here's what it will look like after these steps:
 |
| With the ivory shade all over the lid and the brown shade in the crease |
 |
| Same as above, with closed eye |
4) Finish eyeshadow with a pop of colour!
Next, to add some jewel tones to the eye, apply a medium-toned purple shade to the outer corner of the eye, blending it into the brown shade already in the crease. If you want to add some extra colour (like I did), take a fuchsia-pink shadow, and blend it into the purple shade, extending slightly closer to the centre of your eyelid. If you're a bit colour-shy, forget the pink! Here's what it will look like:
 |
| With purple and pink shades added to outer corner of the lids |
Here is a picture of the liners and mascara I used next:
 |
| Finishing touch eye products: Urban Decay Liquid Eyeliner in Minx, Clinique High Impact Mascara, and Revlon ColourStay Liquid Eyeliner Pen |
5) Apply liquid eyeliner to top and bottom lashlines.
Next, add some black liquid liner (or pencil liner, if you want a softer black) to the top lash line. This will help define the eye and balance out the vibrant pink and purple shades you used. I used Revlon ColourStay Liquid Eyeliner Pen. After that, add a vibrant liquid eyeliner to the bottom lashline. Blend it gently with your finger to soften the shade and prevent a harsh line. I chose a turquoise colour, Urban Decay Liquid Eyeliner in Minx. Here's what it will look like...
 |
| Black liquid liner on the upper lashline |
 |
| Turquoise liquid liner on the bottom lashline |
Finish off the eye look with some volumizing mascara. I used Clinique High Impact Mascara in Black. If you prefer more subtle lashes, try a black-brown or brown shade.
 |
| Add some mascara... Eye look finished! |
7) Add some pink lip gloss... And you're done!
Some pink-toned lip gloss is the perfect way to finish off this spring look. If you prefer a bolder lip, opt for a fuchsia toned gloss (like I did- Korres Cherry Lip Gloss #54 Fuchsia). If bright lips are too much for your taste, choose a more subtle, nude pink gloss instead.
 |
| The completed Colourful Spring Makeup look, with Korres Cherry Lipgloss #54 Fuchsia on lips |
I hope you all found this tutorial fun and informative! Let me know if you have any questions about the techniques or products I used :)


Another great job, Jen! If only I could do my makeup as well as you. I would definitely look better. Mom
ReplyDeleteThanks, Mummy! But I think you look beautiful just as you are :)
ReplyDeleteThe postings on https://write-my-essay.cheap/cheapwritingservice-org-review/ your site are always excellent. Thanks for the great share and keep up this great work! All the best to you.
ReplyDelete